

Google Tag Manager is a tool that allows you to manage tracking codes (analytics, ads, pixels) without having to touch your website files every time. Once properly implemented, GTM becomes a central place for monitoring measurements – faster, cleaner, and with less risk of errors.
In this guide I will show you step by step, how to insert GTM into WordPress website using WPCode Lite – without editing the theme or messing around with PHP files. We'll walk you through the entire process: from setting up an account and container in GTM, through correctly pasting the code onto the website, to testing in Preview mode and publishing the changes.
This is a practical guide for people who want to have assurance that GTM is working properly and is ready for further configuration (e.g. Google Analytics, events, conversions) – regardless of the technical level.
Before you start, it's worth knowing...
GTM is two pieces of code, not one
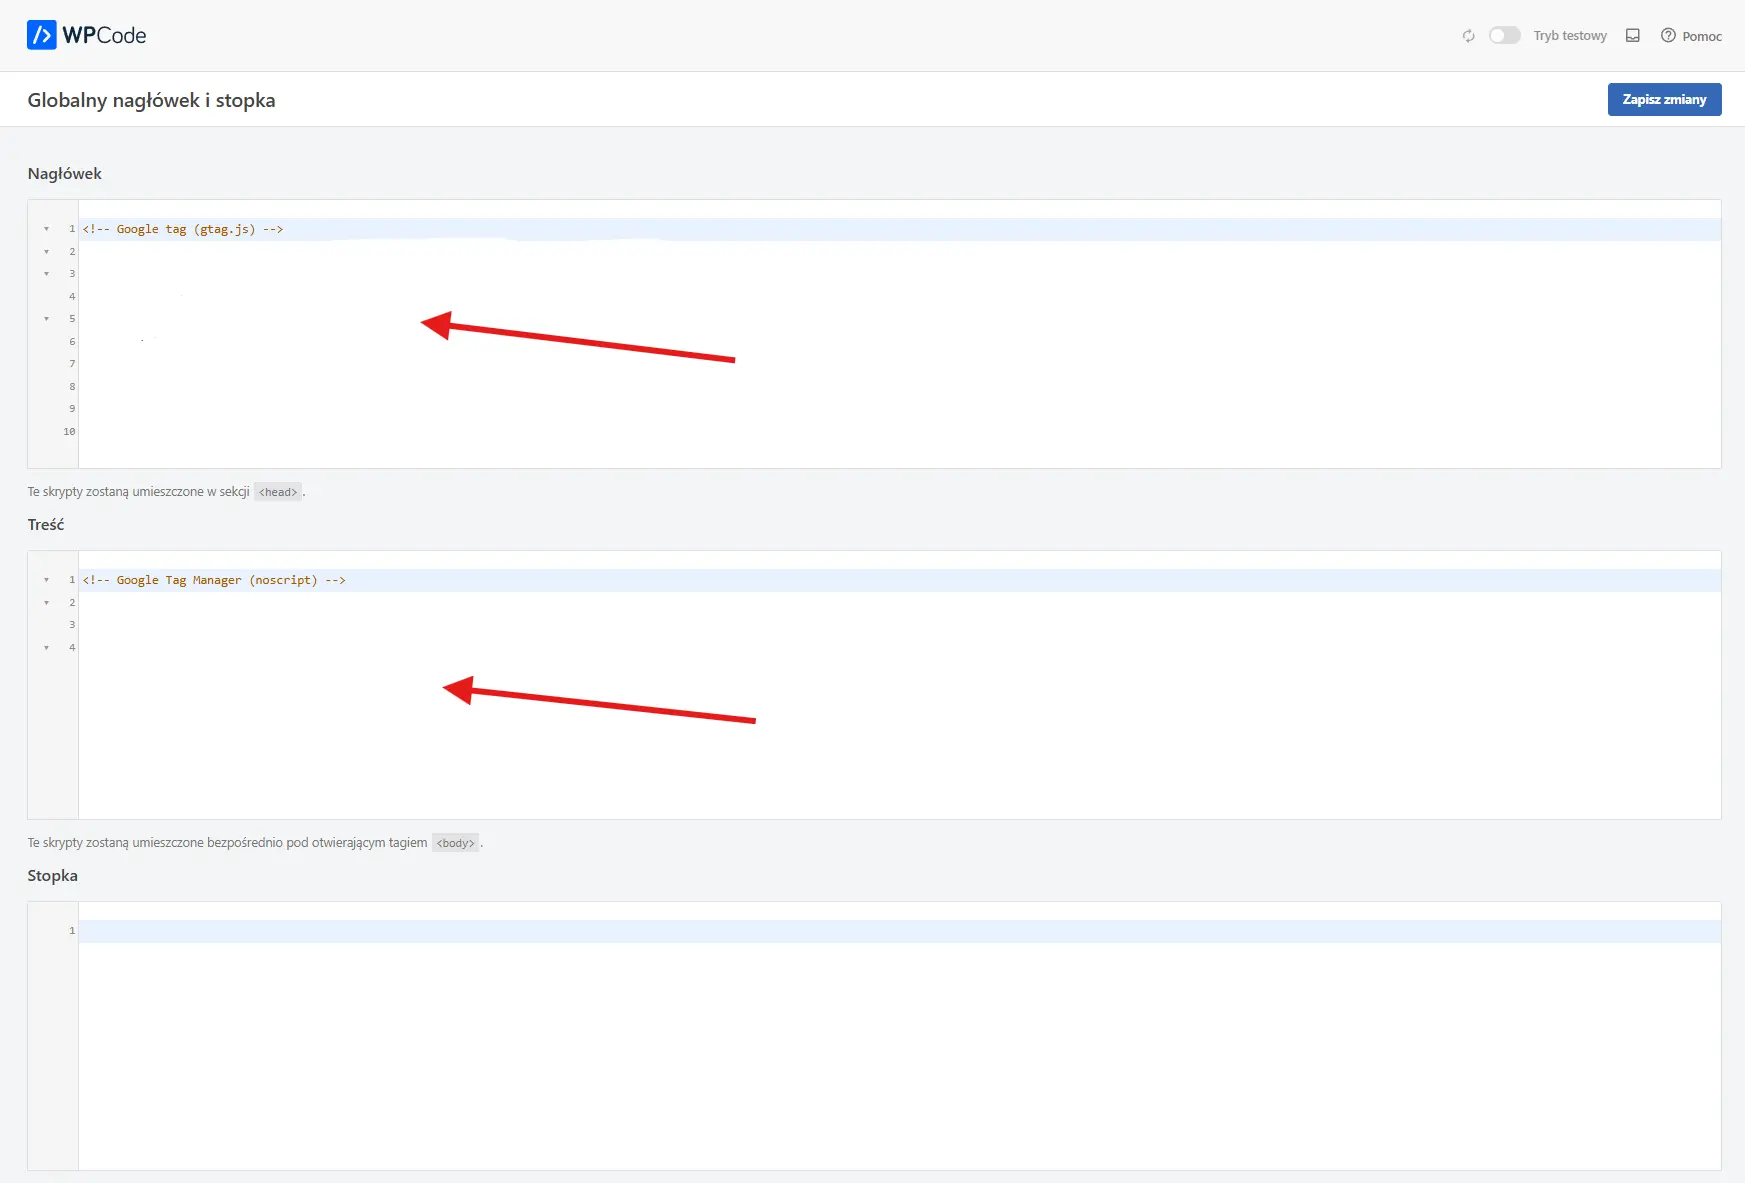
Google Tag Manager requires you to insert the code into both the section<head>, as well as a short fragmentnoscriptright after opening<body>. Omitting any of them is one of the most common causes of problems with testing and measurement.One implementation method = no conflicts
If you have previously added GTM manually or via another plugin, remove the old inserts. GTM should only be implemented in one place – duplicates cause data errors and debugging chaos.
Create an account and create a container in Google Tag Manager
The purpose of this step: get a container GTM type Web and an identifier in the format GTM-XXXXXXX, which you will later insert onto the page.
Steps:
Come in Google Tag Manager and log in to your Google account.
Click Create an account – enter the account name (usually the name of the company or project) and country.
Create container:
• Container name: e.g. website name or domain
• Container type: Web (WWW)
Accept the regulations – after a moment you will see a screen with the installation code.
What is most important at this stage:
• Save/copy it Container ID (GTM-XXXXXXX) – you will use it for installation and testing.
• For now do not configure any tags – first we will correctly insert GTM onto the website.
After this step, you have a ready "base" for further actions - in the next stage, we will download the exact code fragments to paste in WordPress.

Copy GTM installation fragments (head + body)
The purpose of this step: copy both required GTM code fragments, which you will later insert into WordPress.
After creating the container in Google Tag Manager You will automatically see a window with installation instructions. If you closed it, click Container ID (GTM-XXXXXXX) or enter Administration → Installing Google Tag Manager.
You will see two separate pieces of code:
Code for the section
<head>• This is the main GTM script
• It should be as high as possible in
<head>pages
Code
noscriptto the section<body>• Pasted right after opening
<body>• Acts as a fallback, e.g. when JavaScript is restricted
What to do now:
• Copy both fragments and save them (e.g. in a notebook).
• Do not modify the code – we paste it exactly as provided by GTM.

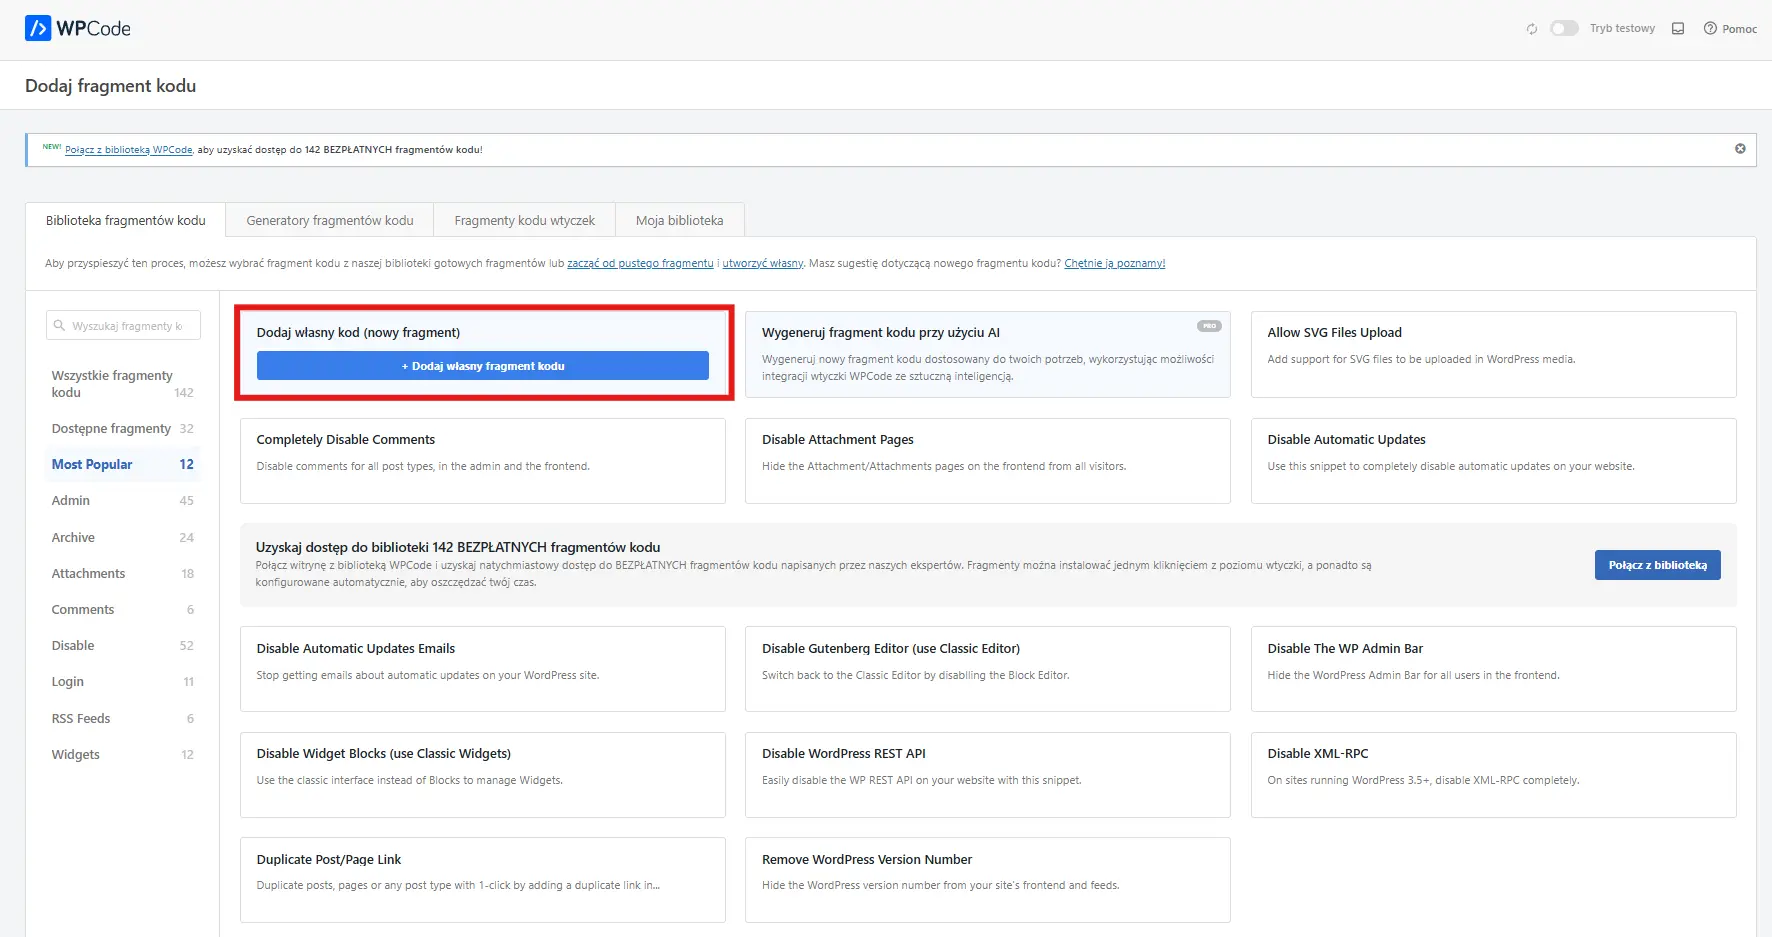
Install and enable WPCode Lite
The purpose of this step: have a safe tool to insert GTM code without editing WordPress theme files.
Steps:
Log in to your WordPress dashboard as an administrator.
Go to Plugins → Add new and search WPCode.
Install and activate WPCode Lite (the free version is perfectly sufficient).
After activation, enter the new section WPCode in the side menu.
Why it's important:
• WPCode allows you to insert scripts globally (head/body) without the risk of losing changes after updating the theme.
• You have full control over it, where and when code is loading.

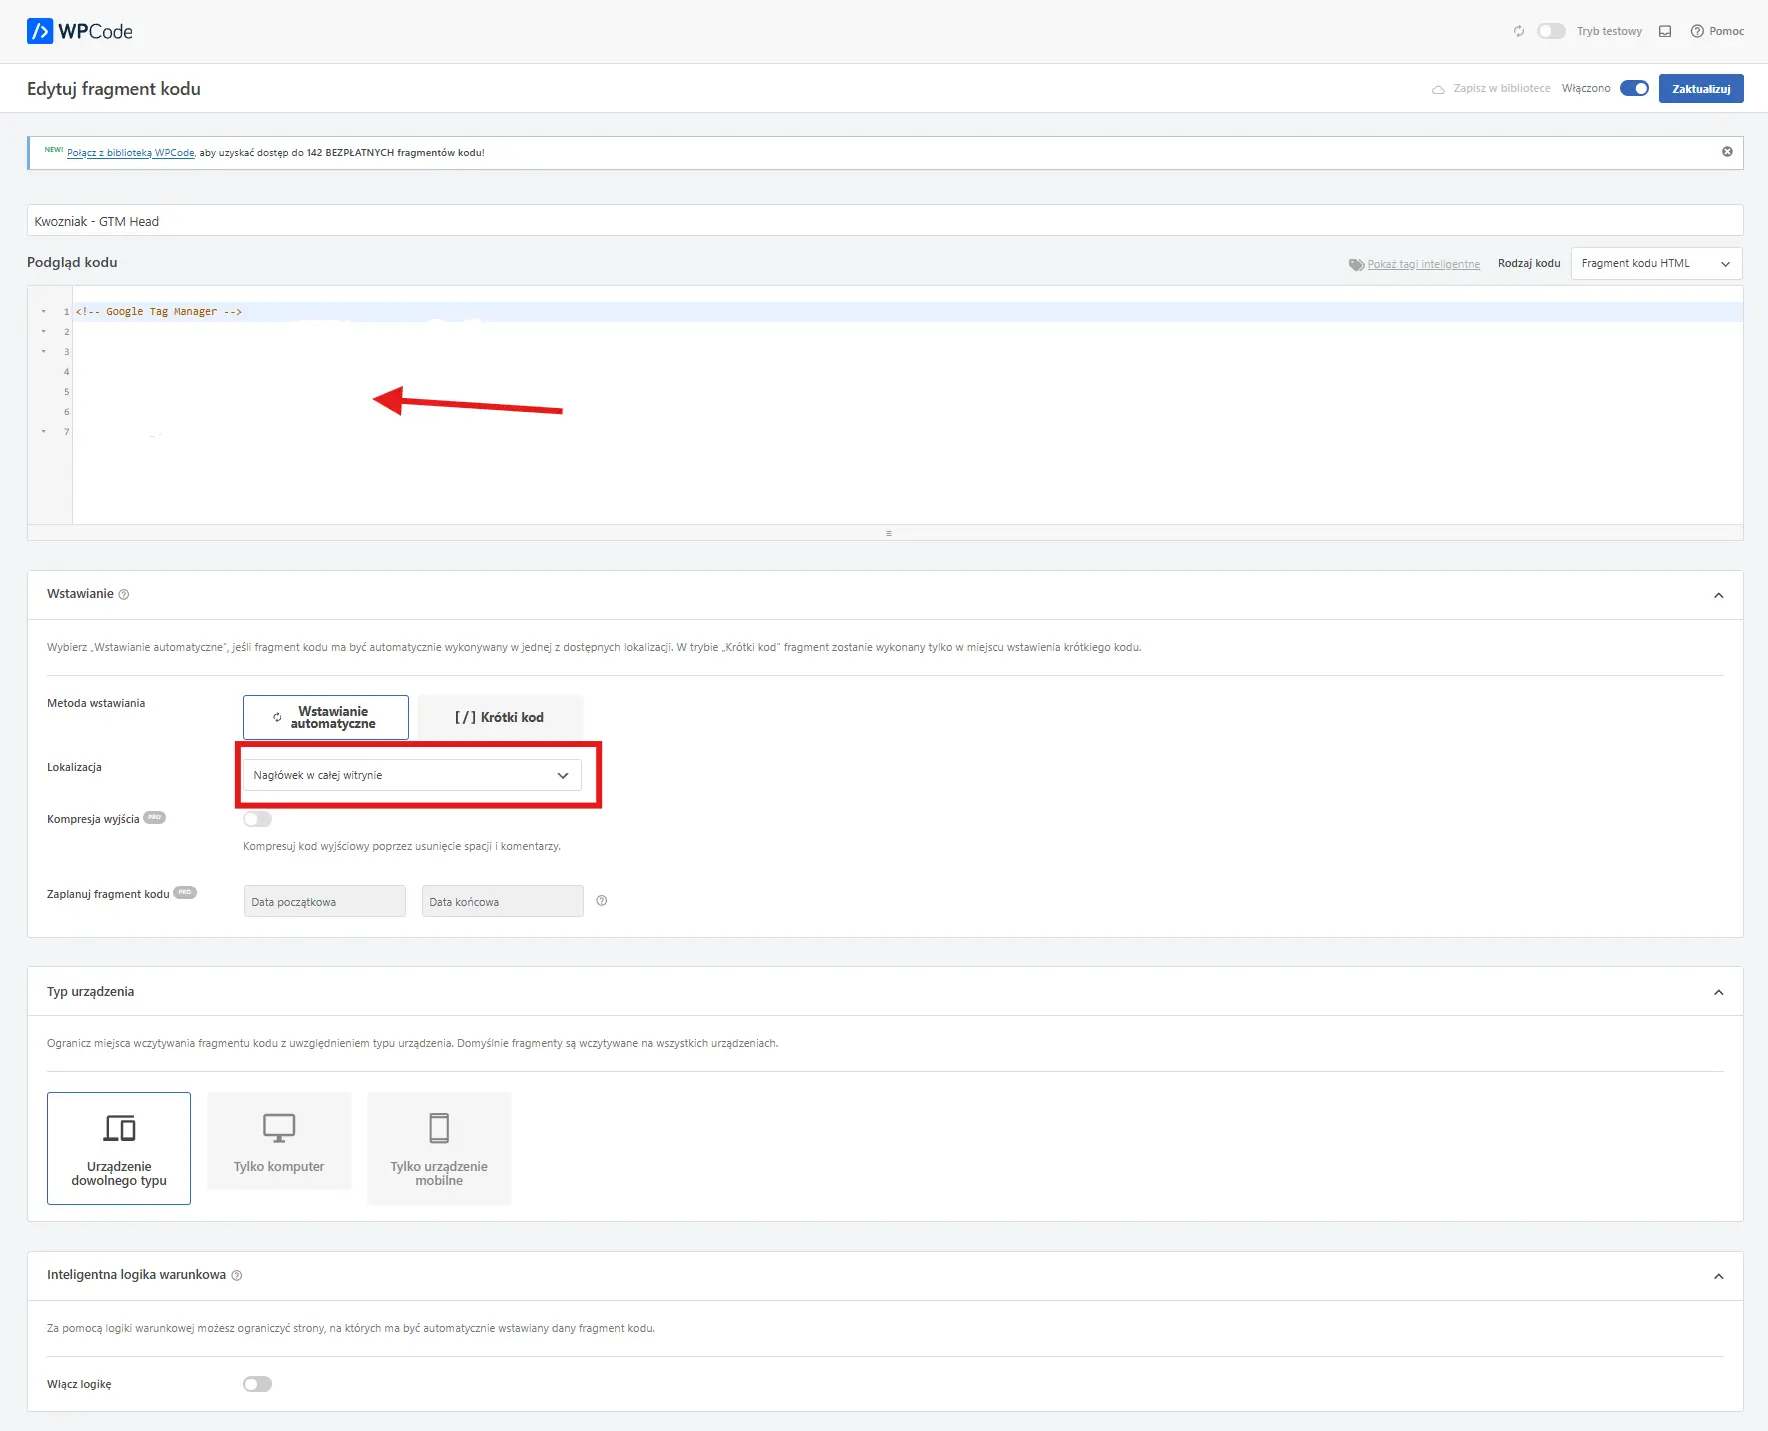
Paste GTM Code into WordPress via WPCode Lite
The purpose of this step: place correctly both code fragments With Google Tag Manager across the entire site – without editing theme files.
Step by step
In your WordPress dashboard, go to WPCode Lite → Header & Footer (or similar section in your version of WPCode).
Fragment to
<head>• Paste the first fragment of GTM (the one from the section
<head>) to the field Header.
Fragment
noscriptdown<body>• Paste second GTM fragment (noscript) to the field Body (if available).
• If you only have Footer – indicate in the guide that it is compromise;
noscriptshould be as high as possible after opening<body>.
Save your changes and make sure the snippet is globally active (all over the page).
What to pay attention to
• Do not modify the code with GTM – paste exactly what Google provides.
• One implementation: remove old GTM embeds from your theme or other plugins to avoid duplicates.
The second way to quickly and easily insert the GTM code into the head and body is to create two separate HTML code fragments as shown in the screenshots below (and include these codes):


Clear the cache and check if the code is actually on the page
The purpose of this step: make sure that the pasted GTM code actually loads on the page and is not "hidden" by the cache.
What to do after saving the code
Clear the page cache
If you're using a cache (plugin, server, CDN), clear it after deploying your code. Without it, you might see an old version of the page, even though GTM is already properly installed.Check the code in the page source
• Open the page in your browser
• Right click → View page source
Search (Ctrl+F) GTM- and check:
• whether the GTM script is in the section <head>
• or a fragment noscript occurs in <body>
Check out some subpages
The code should be visible not only on the main page, but also on subpages – GTM must load globally throughout WordPress.
If you see both GTM fragments in the page code after clearing the cache, the WordPress installation is done correctly. This is a key point – we're not verifying "if the code is there," but does GTM actually work.
Test in GTM: Preview (Tag Assistant) and installation verification
The purpose of this step: confirm that Google Tag Manager actually loads on the page and communicates with the browser.
How to do the test
In the GTM panel, click Preview (preview mode).
In the new window, enter the full website address (with
https://and the correct domain version) and confirm.The page will open in a new tab and the tool will appear Tag Assistant.
What you should see
• Status Connected or information about an active connection.
• Visible container ID
GTM-XXXXXXX.• Event Page View as the first event on the timeline.
If these elements are present, it means that GTM has been correctly inserted and technically working.
The most common reasons for connection failure
• You are testing a different version of the address (www / without www, http / https).
• Cache still serves the old version of the page.
• GTM is inserted twice or in the wrong place (e.g. missing
noscript).
A working Preview mode is clear confirmation that the GTM installation has been completed correctly. At this stage, you can be sure that the site is ready for adding tags, events, and further measurement configuration.


Publishing changes to the container (Submit / Publish) – and what does it change?
The purpose of this step: make the configuration in Google Tag Manager started to really work on the website.
What does publication in GTM mean?
• Mode Preview It is for testing and debugging purposes only.
• Only publication (Submit/Publish) makes changes to the container visible to all site users.
• Without publication GTM is technically installed, but does not perform any production activities.
How to publish changes
In the GTM panel, click Submit.
Add a short description of the version (e.g., "First GTM installation on the site").
Click Publish and confirm.
After publication, GTM saves the new container version, which you can always return to (change history).
What changes after publication
• The container is operational outside test mode.
• All added tags, rules and variables can collect data.
• You can still use Preview to test subsequent changes – without impacting production until you publish them.
Publishing is the moment when testing moves into real-world operation. If the container has been published without errors, GTM is fully active and ready for further development. configuration analytics, events and conversions.
FAQ - questions and answers
NO. Google Tag Manager It doesn't measure anything on its own. Only after you add and publish specific tags (e.g., Google Analytics, events, conversions) will the data begin to appear.
The most common problem is:
- - different website address (www / without www, http / https),
- - cache serving the old version of the page,
- - double GTM installation.
It's also worth making sure that the code is actually visible in the page source.
Yes. Code in <head> is crucial, but a fragment noscript In <body> is also required and recommended by Google. Omitting any of them may cause problems with testing and data completeness.
This is not recommended. Duplicates cause measurement errors (e.g., double pageviews). GTM should be inserted only one method - in this guide by WPCode Lite.
The free version is completely sufficient for installing GTM. Paid features are not required for code insertion or for GTM to function properly.